
Interior Trim: How to Install Base Moulding (Part 2) The Outside Corner
In Part 1 of the "Interior Trim Series," we provided instructions for installing base moulding in the inside corner of a room, and also included a list of tools that are needed to complete this "do it yourself" home improvement project. Part 2 of the "Interior Trim Series" will now focus on the installation of base moulding around a corner.
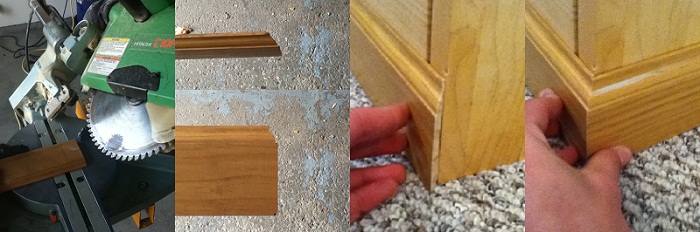
Follow the step-by-step instructions below, and use the picture to help with the installation process for the outside corner.
- Measure your first base trim piece. Remember that the base moulding will wrap around the corner, so your measurement from the corner will be the cut from the back side of the trim piece (for clarification, refer to the middle left picture).
- Set the miter box at 0 degrees for a square cut, and set the bevel at 45 degrees. This is only if the corner is a 90 degree corner, adjust the bevel accordingly for other degree corners (refer to the left most picture). Cut first trim piece at this angle.
- Reverse angle for next trim piece. Measure and cut the next piece at this angle. This piece of base trim should wrap around the remaining edge of corner.
- Hold trim pieces together at the corner to test for a proper fit (middle right and farthest right pictures). If the trim pieces create a tight seam, then they are cut properly and can be nailed into place. If not, adjust the bevel angle accordingly and try again.
Remember that trim corner pieces do not always fit perfectly and adjustments may need to be made. For your first attempt at the corner, cut the base trim pieces slightly long. After all, you can always cut a little more off, but you cannot add any more wood to your piece.
In the next addition of the "Interior Trim Series," we will show you how to properly join trim pieces together when your wall is longer than your base trim piece. This can really come in handy with difficult trim pieces that have an inside corner on one end, and an outside corner on the other. If your unable to cut both, split it into two pieces.


Until then, what questions do you have with wrapping base moulding around a corner? Need or have any extra tips?
Brad Way
Marketing and Sales Representative
Steve Way Builders, LLC - The Remodeling Specialist