
Interior Trim: How to Install Base Moulding (Part 1) The Inside Corner
Today's carpentry tip will show you how to increase the value of your home by installing interior base trim in any room within your home. Replacing base moulding is a rewarding "do it yourself" project for the crafty homeowner looking for a weekend home improvement project.
Part 1 of this Interior Trim series will provide you with helpful tips, along with step by step pictures and instructions, for installing base trim within your home. It will focus on the first difficult area of trim installation, the interior corner.
Tools that will be needed for this "do it yourself" home improvement project include:
- Hand tools (Tape measure, coping saw, hammer, pencil/pen, speed square)
- Power tools (Miter box/saw, air compressor, air nailer)
- Other (Air hose, nail set, trim nails for nailer)
With basic carpentry knowledge, installing base trim in your home is a fairly simple process. The trim is installed around the perimeter of the room at the base of the wall and tight to the floor. It is attached to the wall by using trim nails from the air nailer (a hammer and trim nails can be used if an air compressor and nailer are not available). Base moulding can be installed on floor and wall types.
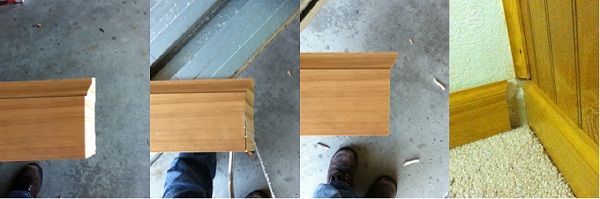
The first difficult area in installing base trim is the inside corner. The picture below will help walk you through the step by step instructions.
- Measure for your first piece of moulding. This piece can run the length of the wall and fit tight from one corner to the next. Cut the trim piece square (0 degrees on the miter box) so that it fits tight to the wall.
- Now you need to prepare the next piece of base moulding so that it fits tight in the corner with the first. This is done by cutting a 45 degree angle with the miter box (farthest left picture).
- The next step is perhaps the most difficult in the process. Take the coping saw and cut off the exposed section of the 45 degree angle cut. This will leave you with a perfect scribe to fit into the corner (middle two pictures). This process takes a little practice, so if your cut doesn't look very good, then try it again.
- The final step is to slide the trim piece into the corner and see how it fits. If your cut with the coping saw is accurate, the trim piece will slide into place, creating a tight fit with the first piece of moulding in the corner (farthest right picture). Once again, if your cut doesn't fit right, try it again as it does take practice.
The inside corner may be the most difficult part of installing base trim within your home. But with time and practice, it is a manageable "do it yourself" home improvement project for the crafty homeowner. In the next addition of the "Interior Trim Series", we will take a look at the steps taken to complete the outside corner for installing base trim.
What questions do you have regarding the interior corner? Any clarifications or other helpful remodeling tips?


Brad Way
Marketing and Sales Representative
Steve Way Builders, LLC - The Remodeling Specialist